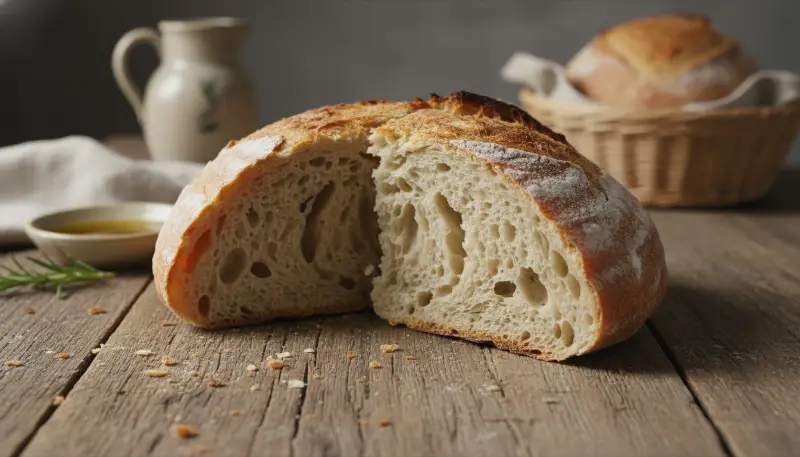
Mastering crispy sourdough bread is an art that combines an active starter, precise hydration, and strategic baking techniques to achieve a perfect, golden, and undeniably delicious crust every time.
There’s nothing quite like the sound of a perfectly crackling crust, and when it comes to sourdough, that ultimate crispiness is the holy grail for many home bakers. This comprehensive guide will walk you through every step to create a magnificent loaf of crispy sourdough bread, transforming your kitchen into a true artisan bakery. Whether you’re aiming for an easy sourdough experience or striving for the perfect sourdough loaf, our detailed instructions and expert tips will help you achieve that coveted crunch and a tender, open crumb. Get ready to bake a truly delicious sourdough!
Beyond the fundamental ingredients, a well-equipped kitchen can elevate your baking and cooking endeavors. For instance, when tackling more complex sauces or purees that might accompany your delicious sourdough, the Ninja BN751 Professional Plus DUO Blender (https://amzn.to/3LCDyNR) offers high-power performance, ideal for creating perfectly smooth textures. If you’re looking to add roasted vegetables or crispy chickpeas to your meal, the Cosori 9-in-1 TurboBlaze Air Fryer 6 Qt (https://amzn.to/4hRWmVq) can achieve perfectly roasted results with less oil, and its large capacity is great for family meals. For fast chopping, slicing, and shredding, a dependable tool like the Cuisinart 8 Cup Food Processor (https://amzn.to/47Nhbg8) becomes a meal prep essential for a variety of complex recipes. And to keep your flour, ingredients, or even baked goods fresh, the FoodSaver Vacuum Sealer Machine (https://amzn.to/4qWgVnS) is excellent for preventing freezer burn and extending freshness, while the Rubbermaid Brilliance Glass Storage Set of 9 (https://amzn.to/4oD0YkY) ensures your prepped ingredients or leftovers are stored in crystal clear, leak-proof containers.
Ingredients for Crispy Sourdough Bread

Achieving the perfect crispy sourdough bread starts with high-quality ingredients. For those new to the process, understanding and maintaining a robust sourdough starter guide is crucial.
- Active Sourdough Starter: A ripe, bubbly, active starter, fed 4-12 hours prior to use.
- Flour:
- Bread Flour: Most common for its high protein, ensuring good gluten structure.
- All-Purpose Flour: Can be used, but bread flour is preferred for optimal texture.
- Whole Wheat Flour: (Optional) Approximately 50g per loaf, for flavor and fermentation aid. For more on flour choices, explore exploring different flour types.
- Rye Flour: (Optional) An alternative to whole wheat for added flavor.
- White Rice Flour: (Optional) For dusting banneton to prevent sticking.
- Water: Filtered, dechlorinated, or spring water, lukewarm (76-85°F or 24-30°C). Quantity varies by flour absorption.
- Salt: Fine sea salt or table salt, essential for flavor, fermentation, and oven spring.
Optional Additions:
- Olive Oil: (12g) For a chewier, softer interior and extended freshness.
- Diastatic Malt Powder: For a more golden color and stronger rise.
Step-by-Step Instructions for Crispy Sourdough Bread
Follow these detailed steps to bake your perfect crispy sourdough bread, ensuring every stage contributes to that desired crackling crust.
- Feed the Sourdough Starter: Ensure your starter is active, ripe, and bubbly, ideally 8-12 hours after its last feeding. It should have doubled in size.
- Mix the Dough (Autolyse/Initial Mix):
- In a large bowl, combine active sourdough starter with water (and olive oil, if using). Stir well.
- Add flour(s) and salt (some prefer to add salt after a rest). Mix with a wooden spoon or hands until a shaggy dough forms, free of dry flour clumps.
- Optional Autolyse: Cover the shaggy dough and let it rest for 30-60 minutes (up to 2 hours). This hydrates the flour and begins gluten development. If using autolyse, sprinkle salt over the dough after the rest and mix thoroughly.
- Bulk Fermentation (First Rise) & Stretch and Folds:
- Cover the bowl and let the dough rise at room temperature (70-78°F or 21-26°C) for 4-12 hours, until strengthened and roughly doubled.
- During the initial 2-4 hours, perform 4-6 sets of “stretch and folds” every 30-60 minutes. This builds dough strength and elasticity.
- Tip: Refrigerate the dough during bulk fermentation if you need to pause the process.
- Pre-shape & Bench Rest:
- Gently transfer dough to a lightly floured surface.
- Shape into a loose round (boule) or log (bâtard) by pulling edges into the center.
- Cover and rest for 15-30 minutes, allowing gluten to relax.
- Final Shape & Cold Proof (Second Rise):
- Shape the dough once more into a tight boule or bâtard, creating surface tension. A bench scraper helps.
- Place shaped dough seam-side up into a floured banneton or lined bowl.
- Cover and refrigerate for a cold proof, typically 10-24 hours, but 24-48 hours is often recommended for best flavor, crust development, and easier scoring. This long cold proof is key to a crispy sourdough crust.
- Preheat Oven and Dutch Oven:
- 45-60 minutes before baking, place a Dutch oven with its lid in the oven and preheat to 475-500°F (245-260°C). High heat is vital for oven spring and crust formation.
- Score and Bake:
- Carefully remove the hot Dutch oven.
- Invert the cold-proofed dough onto parchment paper.
- Lightly dust the loaf with flour (optional) and use a bread lame or sharp knife to make ½-inch deep slashes. For maximum crispiness, spray the dough with cold water and add 2-3 ice cubes between the parchment and the Dutch oven, then immediately cover.
- Carefully transfer dough (with parchment) into the hot Dutch oven.
- Cover and bake with lid on for 20-25 minutes at 450-500°F (230-260°C). This traps steam, promoting expansion.
- Reduce oven temperature (if necessary, to 425-450°F or 220-230°C). Remove lid and bake uncovered for another 20-25 minutes, or until the crust is deep golden brown and crispy. The internal temperature should reach 205-210°F (96-99°C).
- Cool Completely:
- Transfer the finished sourdough bread to a wire cooling rack immediately.
- Allow the bread to cool completely for at least 1-2 hours, ideally 4-6 hours, before slicing. Cutting too soon traps moisture, softening the crust. Mastering this cooling stage is one of many advanced baking techniques that elevate your bread.
Top 10 FAQs About Crispy Sourdough Bread
1. Why is my sourdough crust hard but not crispy?
This often indicates insufficient steaming during the initial bake. Steam allows the dough to expand fully before the crust sets, preventing it from becoming too dense and hard.
2. How do I get a super crispy sourdough crust?
Key methods include baking in a preheated Dutch oven with the lid on to trap steam, removing the lid to allow the crust to dry out, and ensuring adequate cooling on a wire rack. Adding ice cubes or spraying water into the Dutch oven can significantly boost steam for an extra crispy sourdough.
3. Can I achieve a great crispy crust without a Dutch oven?
Yes, alternatives like a baking stone with a pan of hot water or ice cubes at the bottom of the oven can create the necessary steam for crispy sourdough bread.
4. Why is my sourdough crust soft or soggy?
This can be due to insufficient baking, improper cooling (cutting too soon or storing in an airtight container), or a lack of steam during the initial bake, all of which prevent a truly crispy sourdough.
5. What role does hydration play in a crispy crust?
While high hydration can contribute to an open crumb, it also requires proper baking to dry out the crust sufficiently for crispiness. Underproofed dough can also lead to a thick, hard crust, rather than a light and crispy sourdough.
6. How long should I bake sourdough for a crispy crust?
Baking times vary, but typically aim for 20-25 minutes with the lid on and another 20-25 minutes with the lid off. Extending the baking time slightly after the bread appears done can enhance crispiness for your perfect sourdough.
7. Does cold proofing affect the crust?
Yes, a long cold proof (e.g., 24-72 hours) helps the surface dry slightly, which encourages crust development and adds to the complexity of flavor, contributing to a better crispy sourdough.
8. How should I cool my sourdough bread to ensure a crispy crust?
Always cool the bread on a wire rack for at least 1-2 hours, or until completely cool (4-6 hours). This allows excess steam to escape, solidifying the crust and ensuring your crispy sourdough stays that way.
9. How should I store crispy sourdough bread to maintain its crust?
Avoid airtight containers as they trap moisture, softening the crust. A paper bag or a bread box provides a good balance, keeping the interior soft while preserving the crispy sourdough crust.
10. What kind of flour is best for a crispy sourdough crust?
High-quality bread flour with adequate protein content helps create a strong gluten structure, which supports a better rise and crust development for crispy sourdough. Some recipes also use small amounts of whole wheat or rye flour for flavor.
Disclaimer: This blog post contains affiliate links. If you make a purchase through these links, we may earn a small commission at no extra cost to you. This helps support our work in bringing you delicious recipes and cooking tips.