Mastering an easy sourdough starter from scratch is the foundational step to baking irresistible, crispy sourdough bread, transforming simple flour and water into a living ingredient for delicious sourdough recipes.
Embarking on the journey of creating your very own sourdough starter might seem daunting, but fear not! This ultimate guide is designed to make the process of crafting an easy sourdough starter as straightforward and rewarding as possible. Imagine the satisfaction of pulling a warm, crusty loaf of perfect sourdough from your oven, all thanks to a vibrant easy sourdough starter you nurtured yourself. This isn’t just a sourdough recipe; it’s your comprehensive starter guide to unlocking a world of incredible homemade baked goods.
Before we dive into the delightful world of wild yeast, let’s talk about some kitchen essentials that make the process smoother and your overall culinary adventures more enjoyable. For instance, when you’re prepping ingredients for your sourdough, or any complex recipe, a reliable food processor is invaluable. The Cuisinart 8 Cup Food Processor offers fast chopping, slicing, and shredding, making it a meal prep essential. And for storing your precious starter, or any other delicious leftovers, the Rubbermaid Brilliance Glass Storage Set of 9 is perfect, providing crystal-clear, leak-proof, and stackable solutions. If you find yourself with extra flour or other bulk ingredients, keeping them fresh is key. The FoodSaver Vacuum Sealer Machine keeps ingredients fresh up to 5x longer and prevents freezer burn, ideal for buying in bulk for your easy sourdough journey. While not directly for starter, imagine roasting chickpeas for a crunchy topping for your salads or perfectly cooked vegetables to go alongside your bread, the Cosori 9-in-1 TurboBlaze Air Fryer 6 Qt roasts beautifully with less oil and has a large capacity for family meals. And for making smooth purees or sauces to accompany your sourdough bread, the Ninja BN751 Professional Plus DUO Blender delivers high-power performance, ideal for creating everything from tahini sauces to creamy soups.
Essential Ingredients for Your Easy Sourdough Starter

Creating your easy sourdough starter requires just two fundamental ingredients, but the type and quality matter. Patience, along with consistent feeding and a warm environment, are your secret weapons for success over the typical 7 to 14 day period.
Flour:
- Initial Flour: To kickstart fermentation, many experts recommend starting with whole wheat flour, rye flour, or a blend of these, due to their higher nutrient content. Pumpernickel flour is also an excellent choice for its robust flavor development.
- Feeding Flour: For subsequent feedings, unbleached all-purpose flour or unbleached bread flour are commonly used. A blend of whole wheat and bread flour, or even just all-purpose flour throughout, can also be effective for a consistently active starter.
- Water:
- Filtered is Best: Filtered, bottled, or de-chlorinated tap water is highly recommended. Chlorine in tap water can impede the delicate yeast activity. If using tap water, simply let it sit uncovered for 24 hours to allow the chlorine to dissipate.
- Temperature Matters: Warm or lukewarm water, ideally around 75-85°F (24-30°C), is often specified for feedings to encourage vigorous activity. Mineral water, such as San Pellegrino, is also mentioned as beneficial due to its natural mineral content, which can boost fermentation.
Equipment Needed to Make Your Sourdough Starter
- A clean, clear jar (at least 1-quart capacity is ideal for monitoring activity).
- A spoon or fork for thorough mixing.
- A breathable cover (such as a loose-fitting lid, cheesecloth, or a clean kitchen towel) secured with a rubber band.
- A kitchen scale (highly recommended for precise measurements, though cup measurements are often provided for convenience).
Step-by-Step Instructions for Your Easy Sourdough Starter
Creating an easy sourdough starter involves a daily feeding schedule and a good dose of patience. Aim for a consistent feeding time each day. An ideal kitchen temperature is around 70-75°F (21-24°C) to encourage optimal activity.
Day 1: Initial Mixing for Your Easy Sourdough Starter
- Combine Ingredients: In your clean jar, mix equal parts by weight of your chosen initial flour (many recommend whole wheat or rye flour) and warm water. A common starting ratio is 60g (½ cup) flour and 60g (¼ cup or 6 tablespoons) water. Stir thoroughly until no dry lumps of flour remain and the mixture forms a thick, pasty consistency.
- Cover and Rest: Cover the jar loosely with a lid or a breathable cloth, secured with a rubber band. This prevents the starter from drying out while still allowing essential air circulation. Place it in a warm spot, ideally 70-75°F (21-24°C), and let it rest for 24 hours.
Day 2: Observing and Feeding Your Easy Sourdough Starter
- Observe: At this stage, you might see very little activity, or perhaps a few tiny bubbles starting to form. Some methods suggest simply stirring and letting it rest for another 24 hours if activity is minimal, while others recommend the first discard and feed.
- Discard and Feed (if active or following specific methods): If you observe some bubbling or activity, or as a standard procedure to encourage a robust starter, discard about half of the starter (e.g., 60g or ½ cup). Feed the remaining starter with equal parts fresh flour (e.g., unbleached all-purpose or bread flour) and water (e.g., 60g flour + 60g water). Mix well, cover loosely, and return to your warm spot for another 24 hours.
Days 3-7 (and onward, until active): Daily Discard and Feed
This is where consistency is key to developing a strong, active starter for your sourdough bread. Maintaining an easy sourdough starter means daily care.
- Discard: Each day, try to feed your starter around the same time. Before feeding, discard all but 2-4 tablespoons (about 50-60g or ½ cup) of the starter. This vital step prevents the starter from becoming too acidic and ensures there’s enough food for the new flour to ferment efficiently. Remember, you can always use the sourdough discard in various other delicious recipes.
- Feed: To the remaining starter, add equal parts fresh flour (e.g., 60g flour or ½ cup all-purpose/bread flour) and warm water (e.g., 60g water or ¼ cup water). Stir thoroughly until the mixture is smooth, making sure to scrape down the sides of the jar to incorporate everything.
- Rest: Cover the jar loosely again and return it to your consistent warm spot for another 24 hours.
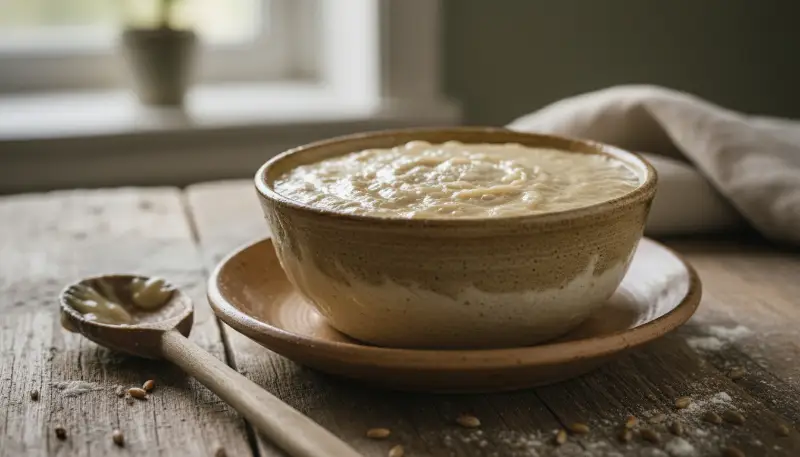
- Observe Activity: Pay close attention to the signs of a thriving starter. Look for bubbles breaking the surface, a pleasant, slightly boozy or yeasty smell (it should never be foul), and ideally, the starter doubling in size after each feeding. The consistency should resemble thick pancake batter or creamy yogurt.
- Troubleshooting:
- Sluggishness: It’s quite normal for activity to slow down around Day 3-4; don’t be discouraged! Be patient and simply continue your consistent daily feeding routine. If it seems particularly sluggish for your easy sourdough starter, double-check that your environment is warm enough (75°F / 24°C is truly ideal). Sometimes, a small addition of whole wheat or rye flour can give it a much-needed boost.
- Liquid on top (Hooch): A clear or light brown liquid, affectionately known as hooch, might accumulate on top. This is a common and completely normal sign that your starter is hungry! Simply stir it back into the starter before discarding and feeding.
- Mold/Pink/Orange color: This is the one sign you need to be firm about. If you observe any colored mold, or pink/orange streaks, unfortunately, you must discard the entire starter and begin anew. This is a sign of undesirable bacterial growth. You can find more helpful tips on troubleshooting your sourdough starter on our site.
Ready to Use (Typically Day 7-14)
Your journey to making crispy sourdough is almost complete!
- Signs of Readiness: Your easy sourdough starter is ready to use when it consistently doubles in size within 4-8 hours after feeding, emits a pleasant yeasty or sour smell, and is visibly very bubbly and active.
- Float Test (Optional but recommended): For an extra confirmation, drop a small amount of your active starter into a glass of water. If it floats, it’s packed with enough CO2 to leaven your bread, meaning it’s truly ready to use in your next sourdough recipe!
- Maintenance: Once your starter is established and active, you have a couple of options for maintenance. You can feed it daily if you keep it at room temperature, or for less frequent baking, you can store it in the refrigerator and feed it weekly to slow down fermentation. When retrieving it from the fridge, it’s best to feed it a couple of times at room temperature until it becomes active and bubbly again before using it for baking. Discover more about how to properly store your sourdough starter for long-term health.
Frequently Asked Questions About Your Easy Sourdough Starter
Here are answers to the top questions budding sourdough bakers often ask about their sourdough starter guide:
- How long does it take to make a sourdough starter? It typically takes anywhere from 7 to 14 days to develop a robust, active starter. In very warm environments, some can be ready in as little as 5 days, while others in cooler settings might take up to 30 days. Patience is truly a virtue here for your easy sourdough!
- What ingredients do I need for a sourdough starter? Primarily, you’ll need just flour and water. Whole wheat or rye flour is often recommended for the initial stages due to their nutrient content, with unbleached all-purpose or bread flour commonly used for ongoing feedings. Always use filtered or de-chlorinated water.
- What should my sourdough starter look and smell like? An active starter should be visibly bubbly, rise significantly after feeding, and then fall back down. It should have a pleasantly sour, yeasty, or slightly boozy aroma. If you notice any pink, orange, or other unusual colors, or a foul, unpleasant smell, it’s best to discard it and start fresh to ensure a healthy easy sourdough starter.
- Why is my sourdough starter not active/bubbly? The most common reason for sluggish activity is a low kitchen temperature; the ideal range is 70-75°F (21-24°C). Ensure consistent feeding, maintain a warm environment, and use lukewarm water during feedings. It’s also normal for activity to slow around days 3-4, just keep going!
- Do I have to discard part of my sourdough starter? Yes, discarding most of your starter before each feeding is crucial. This practice maintains its health, prevents it from becoming overly acidic, and ensures there’s sufficient “food” for the new flour to ferment properly for your easy sourdough starter. Don’t worry, discard can be used in many other delicious recipes!
- What kind of flour is best for a sourdough starter? Whole grain flours, such as whole wheat or rye, are excellent for starting your starter due to their higher nutrient content, which helps to speed up the initial fermentation. For maintaining the starter, unbleached all-purpose or bread flour works very well. You can also use a blend for varied results and flavor profiles in your delicious sourdough.
- What kind of water should I use? Filtered, bottled, or de-chlorinated tap water is always recommended. Chlorine in regular tap water can inhibit the delicate wild yeast. If you’re using tap water, simply let it sit uncovered for about 24 hours to allow the chlorine to evaporate before use.
- How do I know when my sourdough starter is ready to bake with? Your starter is ready when it consistently doubles in size within 4-8 hours after feeding, has a pleasant aroma, and most importantly, passes the float test: a small piece dropped into water should float. This indicates it’s lively enough to make perfect sourdough!
- Can I use metal utensils or bowls with my sourdough starter? Yes, non-reactive metals like modern stainless steel are generally perfectly fine for mixing and holding your starter. The old advice to avoid metal stemmed from concerns about reactive metals, such as copper or aluminum, which could potentially harm the starter.
- How do I maintain my sourdough starter? Once established, you can feed your starter daily if you keep it at room temperature, which is ideal if you bake frequently. If you bake less often, store it in the refrigerator and feed it once a week. Always remember to discard a portion before feeding. Keep it in a clean jar with a loose-fitting lid to allow it to breathe.
Disclaimer: This post contains affiliate links. If you make a purchase through these links, we may earn a small commission at no extra cost to you. We only recommend products we trust and believe will add value to our readers.