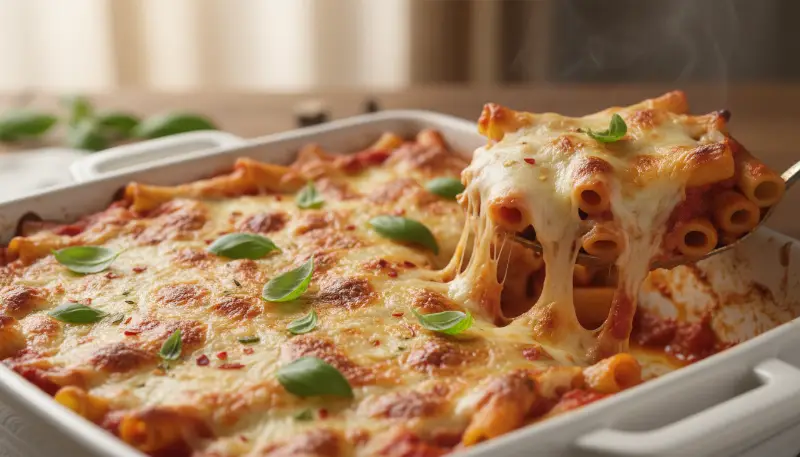
Few dishes command the dinner table with as much rustic authority and comforting warmth as a perfectly executed Baked Ziti, a staple of Italian-American home cooking. This hearty casserole brings together tender pasta, a robust meat sauce, and gooey layers of cheese to create a meal that is both satisfying and timeless.
Ultimate Beef Baked Ziti
20 MIN
45 MIN
8 PERS
Ingredients
- 1 16 oz Package Ziti Pasta
- 2 1 lb Lean Ground Beef
- 3 1 tsp Fennel Seeds (crushed)
- 4 24 oz Marinara Sauce
- 5 1/2 cup Beef Broth
- 6 15 oz Whole Milk Ricotta Cheese
- 7 2 cups Shredded Mozzarella
- 8 1/2 cup Grated Parmesan
Instructions
- 1 Preheat oven to 375°F and grease a 9×13 baking dish.
- 2 Boil the ziti in salted water until just al dente, about 2 minutes less than package directions.
- 3 Brown the ground beef with fennel, onion, and garlic until fully cooked.
- 4 Stir in marinara sauce and beef broth, then simmer for 10 minutes.
- 5 Mix half the sauce with the cooked pasta and dollops of ricotta.
- 6 Layer the pasta in the dish, top with remaining sauce and mozzarella.
- 7 Bake for 30 minutes until cheese is bubbly and golden.
The Anatomy of a Perfect Baked Ziti
When we discuss the culinary architecture of a Baked Ziti, we are looking at a dish that relies on the harmony of textures. Unlike its more structured cousin, lasagna, which requires meticulous layering of flat sheets, Baked Ziti offers a more whimsical, three-dimensional experience. The tube-shaped pasta, known as ziti, serves as a series of miniature tunnels, each waiting to be filled with a savory beef sauce. To reach high-authority status in your own kitchen, you must understand that Baked Ziti is more than just a quick weeknight meal, it is a study in moisture control and flavor depth.
One of the most common pitfalls when making Baked Ziti is the dreaded dry pasta. Because the ziti is hollow, it has a high surface area that absorbs liquid rapidly during the baking process. If you do not account for this absorption by adding extra moisture, such as beef broth, you will end up with a dry, rubbery casserole. Our approach ensures that every bite remains succulent, utilizing a rich beef broth to provide that necessary hydration while enhancing the savory profile of the meat.
Why Beef is the Superior Protein for Baked Ziti
While many traditional recipes rely on Italian sausage mixtures that often contain pork, our version focuses exclusively on high-quality ground beef. The reason is twofold: beef provides a cleaner, more robust umami foundation, and it allows for complete control over the spice profile. By using lean ground beef and seasoning it ourselves with crushed fennel seeds, red pepper flakes, and dried oregano, we can replicate the nostalgic flavor of an Italian kitchen without the need for pork products.
When browning your beef for Baked Ziti, the goal is the Maillard reaction, the chemical process that gives browned food its distinctive flavor. You want to cook the beef until it is no longer just grey, but truly caramelized in spots. This deep browning creates a foundational layer of flavor that carries through the entire dish. Using a Cuisinart 8 Cup Food Processor to finely dice your onions and garlic before adding them to the beef ensures a uniform texture where the aromatics melt into the meat rather than standing out as chunky interruptions.

Developing the Sauce Without Alcohol
In many gourmet Italian sauces, wine is used to deglaze the pan, adding acidity and complexity. However, you can achieve a sophisticated and deep flavor profile in your Baked Ziti without a single drop of alcohol. The secret lies in the substitution of rich beef broth and a touch of tomato juice or a very small amount of balsamic vinegar. The beef broth provides the savory “low notes” that wine typically offers, while the vinegar provides the bright “high notes” to cut through the richness of the cheese.
Allowing your sauce to simmer is crucial. When you combine your browned beef, marinara, and broth, give it time on the stovetop. This simmering period allows the seasonings to bloom and the water content to reduce slightly, intensifying the tomato flavor. If you prefer a smoother sauce texture, using the Ninja BN751 Professional Plus DUO Blender to pulse a portion of the sauce can create a luxurious consistency that coats every inch of the ziti perfectly.
The Art of the Cheese Layer
Baked Ziti is fundamentally a cheese-lover’s dream. We utilize a trifecta of cheeses to achieve the ultimate sensory experience: ricotta for creaminess, mozzarella for the stretch, and parmesan for the salty, golden crust. The way you integrate these cheeses into the Baked Ziti determines the final mouthfeel.
Some chefs prefer to mix the ricotta directly into the sauce, creating a pink, creamy liquid. While this is effective, we recommend the “dollop method.” By placing small scoops of ricotta throughout the middle layer of the Baked Ziti, you create pockets of pure, creamy surprise that contrast beautifully with the zesty meat sauce. Always use whole-milk ricotta for the best results, as low-fat versions can become grainy when baked. For the mozzarella, shredding it yourself using the grating attachment on your food processor will result in a much better melt than pre-shredded bags, which are often coated in cellulose to prevent clumping.
Step-by-Step Technique for Success
1. **The Pasta Par-Boil:** The most critical step in Baked Ziti is undercooking the pasta. If the box says 10 minutes for al dente, boil it for 7 or 8. The pasta will spend another 30 to 45 minutes in the oven, where it will finish cooking by soaking up the beef broth and tomato juices.
2. **The Mixing Phase:** Once your pasta is drained and your sauce is simmered, combine about half of the sauce with the pasta in a large bowl. This ensures that every tube is lubricated before it hits the baking dish. If you put dry pasta in the dish and just pour sauce on top, the middle will stay dry.
3. **Assembly:** Start with a thin layer of sauce at the bottom of your 9×13 dish. Add half the pasta, then your dollops of ricotta and a sprinkle of mozzarella. Add the rest of the pasta, the remaining sauce, and a heavy blanket of mozzarella and parmesan. This layering technique ensures that your Baked Ziti is flavorful from top to bottom.

Essential Kitchen Tools for the Perfect Casserole
To elevate your Baked Ziti to professional standards, having the right equipment is essential. Efficiency in the kitchen leads to better results. For instance, preparing your aromatics and grating large blocks of cheese is made effortless with the Cuisinart 8 Cup Food Processor. It turns a 20-minute prep task into a 2-minute breeze.
If you are meal prepping your Baked Ziti for the week, storage is your next concern. We highly recommend the Rubbermaid Brilliance Glass Storage Set of 9. These containers are leak-proof and glass-based, meaning they won’t stain from the tomato sauce and can go directly from the fridge to the microwave or oven. For long-term preservation, if you are making a double batch of the meat sauce, use the FoodSaver Vacuum Sealer Machine to freeze the sauce. This prevents freezer burn and keeps the flavors as fresh as the day you cooked them.
While the oven is the traditional home for Baked Ziti, you can even use a Cosori 9-in-1 TurboBlaze Air Fryer 6 Qt to reheat individual portions. The air fryer restores that crispy cheese top much better than a microwave ever could, making your leftovers taste just as good as the initial bake.
Serving and Side Dish Pairings
Baked Ziti is a heavy, rich dish, so it pairs best with items that provide a crisp, acidic contrast. A simple arugula salad with a lemon-olive oil dressing is the perfect companion. The bitterness of the greens and the acidity of the lemon cut right through the heavy beef and cheese layers of the Baked Ziti.
Garlic bread is, of course, the classic choice for mopping up any leftover sauce. If you want to keep the meal entirely beef-centric, consider serving a side of roasted vegetables, such as asparagus or broccolini, seasoned simply with salt, pepper, and garlic. For more recipe inspiration and meal planning tips, you can explore our full collection at our post sitemap.
Can I freeze Baked Ziti before cooking it?
Yes, Baked Ziti is one of the best freezer-friendly meals available. To freeze, assemble the dish entirely but do not bake it. Wrap the dish tightly in plastic wrap and then aluminum foil. When you are ready to eat, thaw it in the refrigerator overnight and bake as directed, though you may need to add 10-15 minutes to the covered baking time. This is a great way to use your FoodSaver Vacuum Sealer Machine if you are freezing components separately.
What is the difference between Baked Ziti and Lasagna?
While both dishes use similar ingredients (meat sauce, ricotta, mozzarella, and pasta), the primary difference is the pasta shape and the structure. Lasagna uses wide, flat noodles and is built in very specific layers. Baked Ziti uses tubular pasta and is much more “tossed” in nature. Ziti is generally considered easier to make and easier to serve for large crowds. You can find more pasta variations on our sitemap.
How do I keep the cheese from sticking to the foil?
When baking Baked Ziti, you usually cover it with foil for the first half of the process to trap moisture. To prevent the mozzarella from sticking to the foil and pulling off when you uncover it, spray the underside of the foil with a bit of non-stick cooking spray before placing it over the dish. This ensures your cheese remains on the pasta where it belongs.
Final Thoughts on This Classic Dish
Mastering Baked Ziti is a rite of passage for any home cook looking to provide high-quality comfort food. By focusing on the quality of the beef, ensuring the sauce is adequately hydrated with beef broth, and using superior kitchen tools like the Cuisinart Food Processor, you transform a simple pasta bake into a culinary masterpiece. Whether you are serving a large family gathering or prepping meals for the week in your Rubbermaid Brilliance Glass Storage, this recipe delivers consistent, delicious results every time.
Remember that the key to a great Baked Ziti is patience. Let the dish rest for 5 to 10 minutes after it comes out of the oven. This allows the sauce to settle and the cheese to firm up slightly, making it much easier to scoop out clean, beautiful portions. For more detailed guides and kitchen secrets, visit our official sitemap.