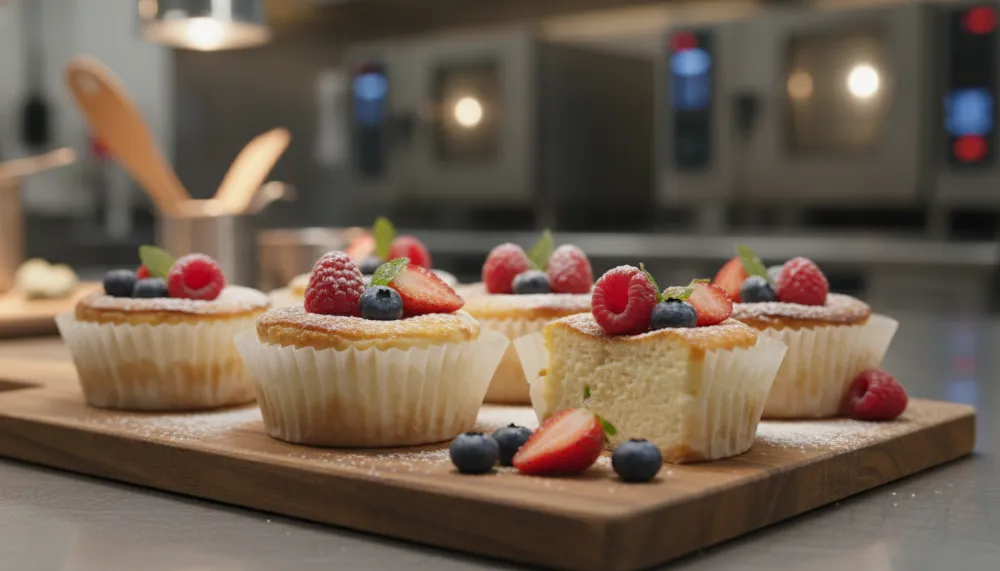
Experience the ultimate dessert luxury with these creamy Mini Cheesecakes Individual, perfectly portioned for maximum flavor and effortless serving. This recipe delivers a velvety texture and a buttery crust that rivals the finest bakeries, all from the comfort of your kitchen.
Individual Mini Cheesecakes
INGREDIENTS
- ● 1.5 cups Graham Cracker Crumbs (ensure no lard)
- ● 4 tbsp Unsalted Butter, melted
- ● 16 oz Cream Cheese, room temperature
- ● 2/3 cup Granulated Sugar
- ● 2 Large Eggs, room temperature
- ● 1 tsp Vanilla Bean Paste (Alcohol-Free)
- ● 1/4 cup Heavy Cream
- ● 1 tsp Lemon Juice
INSTRUCTIONS
- Prep: Preheat oven to 325°F (160°C). Line a standard muffin tin with paper liners.
- Crust: Combine cracker crumbs and melted butter. Press 1 tablespoon into each liner. Bake for 5 minutes, then cool.
- Filling: Beat cream cheese and sugar until smooth using the Ninja BN751 Professional Plus DUO Blender for a perfectly aerated texture.
- Combine: Add eggs one at a time, followed by vanilla paste, heavy cream, and lemon juice. Do not overmix.
- Bake: Pour batter over crusts. Bake for 18 to 20 minutes until edges are set but centers slightly jiggle.
- Chill: Cool to room temperature, then refrigerate for at least 4 hours before serving.
The Fascinating History of Mini Cheesecakes Individual
The journey of Mini Cheesecakes Individual is not merely a modern culinary trend but a story that spans over four millennia. While we often associate cheesecake with New York diners, its origins lie in Ancient Greece. Specifically, on the island of Samos, archaeologists have unearthed cheese molds dating back to 2000 BCE. These early iterations were far simpler than our modern versions, consisting of a mixture of honey, wheat, and pounded cheese. These were not just treats, they were high-energy food sources served to athletes during the first Olympic Games in 776 BCE.
When the Romans conquered Greece, they adopted the cheesecake and added eggs, creating a dish known as libum. As the Roman Empire expanded, these techniques traveled across Europe, eventually reaching the British Isles. It was here that the transition toward the individual portion began to take shape. Medieval cookbooks often featured recipes for small tartlets and cheese-based custards, which were easier to cook evenly in wood-fired ovens than large, dense cakes.
The most significant turning point for Mini Cheesecakes Individual occurred in 1872. William Lawrence, an American dairyman, accidentally invented cream cheese while attempting to recreate French Neufchâtel. This invention revolutionized the texture of the dessert, moving it from a grainier, curd-based pudding to the silky, dense masterpiece we enjoy today. The rise of individual portions in the late 20th century was driven by the catering industry, where chefs sought ways to provide consistent portion control and elegant presentation without the mess of slicing a large cake.
Nutritional Insight for Your Favorite Treat
Understanding the nutritional profile of Mini Cheesecakes Individual allows you to enjoy them as part of a balanced lifestyle. Because these are served in individual portions, they naturally provide built-in portion control, which is often difficult to maintain with a full-sized cake. A standard 60g portion typically contains between 180 and 250 calories.
The primary source of nutrition in these desserts is the dairy component. Cream cheese and heavy cream provide a significant amount of calcium and protein. To ensure the highest quality while adhering to dietary restrictions, we use only beef-sourced gelatin if a stabilizer is required for no-bake versions, ensuring the recipe remains entirely pork-free. The fats found in these mini treats are primarily saturated fats from the cheese and butter, which provide the satisfying mouthfeel that characterizes a professional-grade cheesecake.

Professional Flavor Variations
One of the reasons Mini Cheesecakes Individual have become a staple in high-end pastry shops is their versatility. Because each unit is separate, you can easily customize a single batch into multiple flavor profiles. Here are some professional variations that strictly avoid alcohol and pork products:
1. Zesty Citrus and Wild Blueberry
By infusing the cream cheese batter with fresh lemon and lime zest, you cut through the richness of the fats. A blueberry reduction, made by simmering fresh berries with sugar and a splash of apple juice, creates a vibrant topping that is both visually stunning and delicious.
2. Salted Caramel and Toasted Pecan
For a deeper flavor, use a crust made from crushed digestive biscuits and toasted pecans. The topping is a house-made salted caramel using butter, cream, and sea salt. This variation provides a wonderful contrast between the smooth filling and the crunchy nuts.
3. Raspberry Coulis and White Chocolate
Melt high-quality white chocolate into the batter before baking. Once cooled, swirl a raspberry coulis, which is simply strained raspberry purée and sugar, across the top. This creates a beautiful marble effect that is perfect for formal occasions.
Essential Tools for Mini Cheesecake Perfection
To achieve professional results when making Mini Cheesecakes Individual, the right equipment is essential. Here are our top recommendations for your kitchen:
- Ninja BN751 Professional Plus DUO Blender: Check Price on Amazon (Why Perfect: Its 1000W motor ensures the cream cheese is perfectly smooth and free of lumps, which is the most common mistake in cheesecake making).
- Cosori 9-in-1 TurboBlaze Air Fryer 6 Qt: Check Price on Amazon (Why Perfect: This is an incredible tool for quickly toasting the nuts for your crust or even baking small batches of cheesecakes using the bake setting for rapid heat distribution).
- Cuisinart 8 Cup Food Processor: Check Price on Amazon (Why Perfect: Essential for pulsing your graham crackers or biscuits into a uniform crumb, ensuring a crust that doesn’t crumble apart).
- Rubbermaid Brilliance Glass Storage Set: Check Price on Amazon (Why Perfect: These are leak-proof and stackable, making them the best choice for chilling your Mini Cheesecakes Individual in the fridge without them absorbing other food odors).
- FoodSaver Vacuum Sealer Machine: Check Price on Amazon (Why Perfect: If you plan on freezing your mini cheesecakes for future events, vacuum sealing them prevents freezer burn and keeps them fresh for months).

The Secret to the Perfect Texture
The hallmark of a great Mini Cheesecakes Individual is the texture. It should be firm enough to hold its shape but soft enough to be creamy on the tongue. There are three critical factors to achieving this: temperature, aeration, and cooling.
First, all ingredients must be at room temperature. Cold cream cheese will inevitably lead to lumps, no matter how much you blend it. Cold eggs can also cause the batter to seize. By letting your ingredients sit on the counter for at least two hours before beginning, you ensure a seamless emulsion. Second, avoid overbeating the batter once the eggs are added. Over-aeration causes the cheesecakes to rise too much in the oven and then collapse, creating deep cracks. Finally, the cooling process is vital. Do not rush the transition from the hot oven to the cold refrigerator. Let them sit in the tin at room temperature first to allow the structure to stabilize.
Storage and Freezing Guidelines
Mini Cheesecakes Individual are the perfect make-ahead dessert because they actually improve with a little time. Once baked and cooled, they can be stored in the refrigerator for up to five days. It is best to keep them in an airtight container like the Rubbermaid Brilliance Glass Set to maintain their moisture levels.
For long-term storage, these treats freeze exceptionally well. Wrap each individual cheesecake in plastic wrap and then place them in a freezer bag or use the FoodSaver Vacuum Sealer for maximum protection. They can be frozen for up to three months. To serve, simply thaw them in the refrigerator overnight. This makes them an incredible option for busy hosts who want to prepare their desserts weeks in advance.