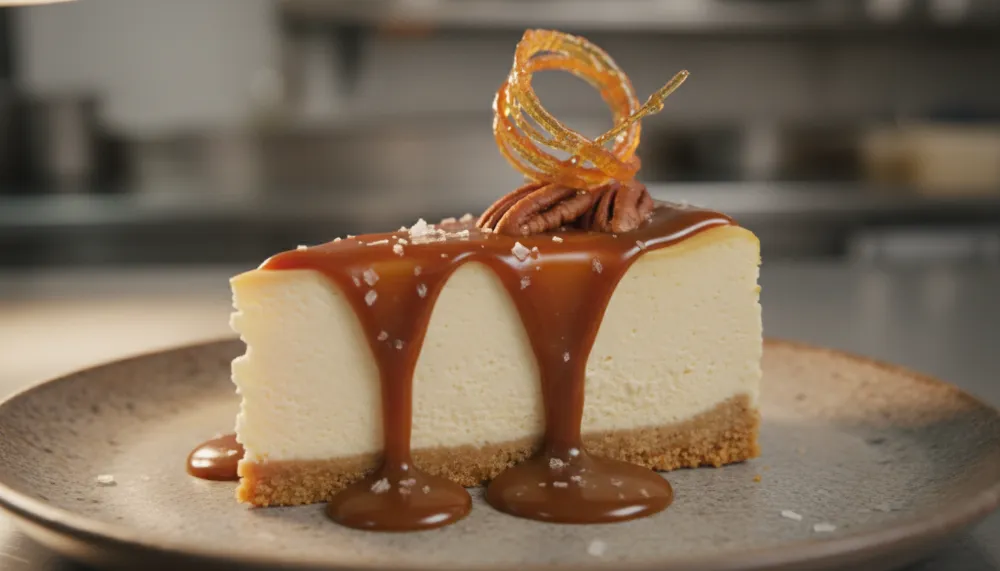
Experience the ultimate dessert harmony with this Salted Caramel Cheesecake, Silky, Sweet & Salty!, featuring a velvety cream cheese center and a rich, golden caramel drizzle. This recipe bridges the gap between classic baking and modern confectionery science to deliver a professional result in your home kitchen.
Salted Caramel Cheesecake, Silky, Sweet & Salty!
Ingredients
- 1 2 cups Graham cracker crumbs (approx. 15 full sheets)
- 2 1/2 cup unsalted butter, melted
- 3 32 oz full-fat cream cheese, softened to room temperature
- 4 1 cup granulated white sugar
- 5 1 cup full-fat sour cream, room temperature
- 6 1 tablespoon vanilla bean paste (alcohol-free)
- 7 4 large eggs, room temperature
- 8 1 cup granulated sugar (for caramel)
- 9 6 tablespoons salted butter, cubed
- 10 1/2 cup heavy cream
- 11 1 teaspoon flaky sea salt
Instructions
- 1 Preheat oven to 350°F (175°C). Mix cracker crumbs and melted butter, press into a 9-inch springform pan, and bake for 10 minutes.
- 2 Beat softened cream cheese and 1 cup sugar until smooth. Add sour cream and vanilla, mixing on low to avoid air bubbles.
- 3 Add eggs one at a time, mixing just until combined. Pour over the crust.
- 4 Bake in a water bath at 325°F (160°C) for 60-70 minutes until edges are set but center jiggles slightly. Cool slowly in the oven with the door cracked.
- 5 For the caramel, melt 1 cup sugar in a pan until amber. Stir in butter, then slowly pour in heavy cream and salt. Boil for 1 minute, then cool.
- 6 Chill cheesecake for at least 6 hours. Drizzle with caramel before serving.
The Historical Journey of the Salted Caramel Cheesecake
To truly appreciate the Salted Caramel Cheesecake, Silky, Sweet & Salty!, one must look back at the centuries of culinary evolution that brought these flavors together. The foundation of this dessert, the cheesecake itself, has roots that stretch back to Ancient Greece. Around 776 BCE, a primitive form of cheesecake made of pounded cheese, honey, and wheat was served to athletes during the first Olympic Games as a source of energy. This early iteration was far from the silky texture we enjoy today, but it established cheese as a viable base for sweet preparations.
The transformation into the modern, creamy baked cheesecake occurred in the 18th century when Europeans began using beaten eggs as a leavening agent. This eliminated the need for yeast and created the smooth, custard like consistency that defines the New York style cheesecake. However, the addition of salted caramel is a much more recent breakthrough. Salted caramel was pioneered by Henri Le Roux in Brittany, France, in 1977. Le Roux, a visionary chocolatier, utilized the region’s famous salted butter to create a caramel that was both sweet and savory. This innovation, initially known as caramel au beurre salé, revolutionized the world of confectionery and eventually paved the way for the Salted Caramel Cheesecake, Silky, Sweet & Salty! trend that took the world by storm in the early 2000s.
The Anatomy of the Perfect Crust
A masterpiece requires a solid foundation, and for this Salted Caramel Cheesecake, Silky, Sweet & Salty!, that means a crust that provides a significant textural contrast to the filling. While many recipes settle for basic Graham cracker crumbs, the professional approach involves precision. Using a Ninja BN751 Professional Plus DUO Blender allows you to achieve a uniform, sandy texture that mimics professional pastry flour. This blender’s 1000W motor is incredibly efficient at pulverizing crackers and nuts into a fine dust, which, when mixed with high-quality melted butter, creates a base that holds its shape without becoming greasy.

Professional chefs often experiment with the base to enhance the “salty” aspect of the Salted Caramel Cheesecake, Silky, Sweet & Salty! profile. A popular variation involves mixing crushed pretzels with the Graham crackers. This adds a sharper salt note and a distinct crunch. For those who want a more complex flavor, using Biscoff cookies or ginger snaps provides a spiced undertone that complements the caramel drizzle. The key to a successful crust is the pre bake. Baking the crust for 10 minutes before adding the filling ensures that it stays crisp even after hours of contact with the moist cream cheese batter.
Mastering the Silk: The Cream Cheese Filling
The hallmark of a Salted Caramel Cheesecake, Silky, Sweet & Salty! is the texture of the filling. Achieving that “silky” mouthfeel requires careful temperature management and specific mixing techniques. All ingredients, especially the cream cheese, eggs, and sour cream, must be at room temperature. Cold cream cheese is the primary cause of lumps, which can ruin the aesthetic and sensory experience of the dessert. For the best results, use a Cuisinart 8 Cup Food Processor to blend the cheese and sugar. This ensures a completely aerated and smooth mixture that is difficult to achieve by hand.
One of the most critical steps is to avoid over-incorporating air. While we want the cheese to be smooth, whipping too much air into the eggs can cause the cheesecake to rise like a soufflé and then collapse, creating deep cracks on the surface. To prevent this, always mix the eggs on the lowest setting and only until they are just combined. Adding a tablespoon of vanilla bean paste instead of liquid extract provides those beautiful black specks and a deep, aromatic flavor that balances the heavy dairy components.
The Alchemy of Salted Caramel
The caramel topping is the soul of the Salted Caramel Cheesecake, Silky, Sweet & Salty!. Creating a dry caramel involves melting granulated sugar without the addition of water, a process that requires constant vigilance. As the sugar crystals break down and turn into a dark amber liquid, the Maillard reaction occurs, creating hundreds of complex flavor compounds that simple sugar lacks. Once the sugar reaches that perfect amber hue, adding butter and heavy cream stops the cooking process and creates a stable emulsion.
The “salted” part of the equation is not just about seasoning, it is about chemistry. Salt suppresses the perception of bitterness in the caramel while enhancing the sweetness and providing a clean finish on the palate. Use flaky sea salt for the best results, as the larger crystals provide intermittent bursts of flavor rather than a monolithic salty taste. If you find your caramel is too sweet, a splash of concentrated apple juice can provide the necessary acidity to brighten the profile without the need for alcohol.

The Science of the Water Bath
Why do we use a water bath, or bain-marie, for a Salted Caramel Cheesecake, Silky, Sweet & Salty!? The answer lies in thermodynamics. A cheesecake is essentially a custard, and eggs are highly sensitive to heat. Without a water bath, the edges of the cheesecake would reach the oven temperature (325°F or higher), causing the proteins to over-coagulate and become rubbery before the center is cooked. Water evaporates at 212°F (100°C), meaning the water surrounding the pan acts as a heat shield, ensuring the cheesecake never exceeds that gentle temperature. This results in a uniform, creamy texture from the edge to the center.
Flavor Variations and Professional Twists
If you want to take your Salted Caramel Cheesecake, Silky, Sweet & Salty! to the next level, consider incorporating roasted nuts. Using a Cosori 9-in-1 TurboBlaze Air Fryer 6 Qt, you can perfectly roast macadamia nuts or pecans in just minutes. These can be folded into the caramel or used as a decorative border around the top of the cake. Another professional secret is the “umami twist.” Adding a teaspoon of light soy sauce to your caramel provides a savory depth that pairs exquisitely with the tang of the cream cheese, making the dessert feel more sophisticated and less cloying.
Storage and Preservation Tips
Cheesecake is an investment in time and ingredients, so proper storage is essential. The high fat and moisture content make it susceptible to absorbing odors from the refrigerator. Always store your Salted Caramel Cheesecake, Silky, Sweet & Salty! in a high quality container like the Rubbermaid Brilliance Glass Storage Set. These containers are leak proof and provide an airtight seal that keeps the cheesecake tasting fresh for up to five days. For long term storage, slices can be vacuum sealed using a FoodSaver Vacuum Sealer Machine. This prevents freezer burn and allows you to enjoy a perfect slice of Salted Caramel Cheesecake, Silky, Sweet & Salty! weeks after it was baked.